As a certified prenatal yoga instructor, I can help guide you through the best yoga sequences for YOUR pregnancy. Every woman's pregnancy is different and each woman has specific exercises she can do for her body.
Yoga is a powerful form of exercise that encourages flexibility in the body as well as the mind (how perfect for labor!) Consider your choice to do yoga as a gift that you give to yourself and to your unborn baby during your pregnancy. It will reduce your daily stress and sweeten your inner environment for your baby. Yoga awakens mind/body harmony, making it easier for you to make choices that are good for you both physically and emotionally. Yoga can also help relieve many discomforts of pregnancy.
Below you can find some basic and simple yoga positions to try out. If you are interested in a personalized yoga sequence, have questions or would like tips on best positions for you; please reach out at no extra cost!
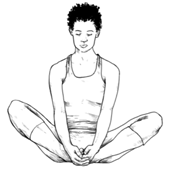
- Butterfly Pose
Sit at the edge of a blanket with the heels and soles of your feet together. Pull your feet in toward your body so that they are comfortably close. Rest your hands on your toes or on top of your feet. Close your eyes and lengthen through your spine.
Allow your bottom to sink down into your blanket. Feel yourself lengthening upward and releasing downward at the same time.
After a few breaths, place your hands on the floor directly in front of your feet. Let your head and neck hang forward, softening your elbows as much as you can and allowing your shoulders to release downward.
Benefits of Butterfly Pose:
-Throughout pregnancy your body releases hormones that help to soften the ligaments that hold together your pelvic girdle. Increasing the flexibility of these ligaments enables your pelvis to shift and wide, making it easier for our baby to maneuver her way through your body.
Cat and Cow Pose
Get onto your hands and knees. Your knees should be comfortably apart, with your hands resting beneath your shoulders with palms down and fingers spread wide. Let your neck and head hang forward while tucking your toes under.
Begin to round your bottom under so that you feel a stretch in your lower back.
Press your palms gently into the floor and, starting from your tailbone, begin to round your spine one vertebra at a time up toward the ceiling, and bring your chin toward your chest
Slowly release your body back to center, aligning your head with your spine.
Now, soften your belly, allowing it to sink toward the floor. Simultaneously, begin to tip your bottom up toward the ceiling, so you create a small arch in your lower back. Lift your head and neck gently upward as though you were peering at someone in front of you. Imagine sending your breath down your spine into your lower back.
Continue to move back and forth through both parts of this pose. Breathe into places where you feel tightness.
Benefits of Cat and Cow pose:
Increases spinal flexibility and hip mobility.
Stretches tight muscles that contribute to low back pain.
It has been suggested that this pose may help rotate posterior babies.
Squat Pose
From the hands and knees position in the Cat and Cow pose, begin to walk your hands back toward your knees. Lift your knees up off the floor. Sink back into your feet and allow your heels to release down toward the floor.
Allow your bottom to soften and lengthen your tailbone toward your heels.
Clasp your palms and fingers together in front of your heart. Place your elbows between your knees and use your elbows to spread your knees apart. Let your neck and head hang forward comfortably and soften your pelvic floor.
As you take your next inhalation, visualize bringing oxygen and nourishment to you and your baby. As you exhale, allow your pelvic floor to soften. Inhale nourishment and as you exhale release any tightness, tension or fears.
Benefits of Squat Pose:
Widens pelvis and works with gravity to get the baby through the birth canal during birth.
Relaxes pelvic musculature
This position can help ease labor and reduce the chances for tearing of perineal tissue.
Pelvic Tilts
Lie back on your blanket with your feet on the floor and your knees pointing toward the ceiling Lengthen your neck and allow your shoulders to soften. Allow your arms to rest at your sides.
Bring your knees into alignment with your hips. Press weight into your heels and lift your bottom off the floor as high as you can, pressing your pubic bone toward the ceiling.
Stretch your knees out over your toes as your bottom continues to lift. Soften your head, neck and shoulders and arms, take a few long, slow breaths.
Now from your upper back begin to lower your spine, releasing one vertebra at a time until your bottom is resting comfortably on the floor. Repeat.
Benefits of Pelvic Tilts:
This posture imrpoves spinal flexibility
Relieves congestion in the lower back muscles.
Improves circulation in the pelvic area and massages your internal organs.
Check back later this week for the second installment of our Prenatal Yoga Blog!!
Citations:
Chopra, Deepak, David Simon, and Vicki Abrams. Magical beginnings, enchanted lives: a holistic guide to pregnancy and childbirth. London: Rider, 2005. Print.

